Working with Computer Windows
In the previous lessons on using Hyperlinks and the Back Button, you learned that clicking on hyperlinks will sometimes open a 2nd web browser window. Now, it is time to learn more about how to work with multiple windows.
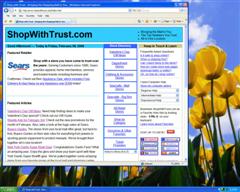
Look at the adjacent image. You will see one web page in front of a screen full of yellow tulips. This web page is open with the help of web browser software. This counts as one window on your desktop. The desktop is the area covered in tulips. It is what you see when there are no windows open on your computer. Instead of yellow tulips, your desktop probably shows a different background image. This background image is known as wallpaper. We discuss how to change your wallpaper image in an advanced lesson.
Now, let's get back to discussing windows. Earlier, we mentioned that some hyperlinks open a 2nd web browser window. If you do this mulitple times, you will have several open windows on your desktop. If you open another software program, such as a Word document, an Excel spreadsheet, or Quicken financial software, each will open as a separate window. There are two ways to switch between each of these windows.
Switching between windows
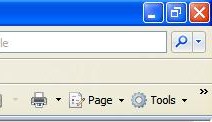
In our previous lesson on the Back Button, we touched upon the most common way to switch between windows. We've shown the image again adjacent to this paragraph. You will see on the bottom taskbar, two tabs. Each tab represents an open window. You click on the desired tab to bring that one to the front of the other windows. In our image, we only have two tabs, so there are only two open windows. You will have several tabs along this taskbar if you have several windows open at once. Ideally, you do not want too many windows open at the same time because it may start slowing down your computer. If you notice your computer starting to respond slowly to your actions, you should start closing down some of the windows.
Another way to switch between windows is to use the 'Alt' and 'Tab' keys on your keyboard. While holding down your 'Alt' key, click on your 'Tab' key. With each click of your 'Tab' key, you will see an image of an open window and a small description. Once you let go of the keys, the selected window will be brought to the front of all other windows.
Minimizing, Maximizing, and Closing a Window
Sometimes when you open a new window, you will notice it takes up the entire screen, except for the taskbar at the bottom. Other times, the new window does not take up the full screen. For example, in our earlier image of a web page in front of a field of yellow tulips, the window did not take up the whole screen since you were still able to see the tulips. If it did take up the full screen, you would not have seen the tulips.
This difference is determined by the setting in the top right corner of your window. In the adjacent image, you will see three little boxes. The one on the left is a straight horizontal line along the bottom of the box. The one in the middle is the image of two overlapping squares (this represents two windows). The red box on the right has a white 'x'. You are probably already familiar with red box with the 'x'. You click on that to close a window. The middle box, with two overlapping windows, is the toggle to switch the window from occupying the full screen or only a portion of the screen. Clicking on this toggle will alternate the toggle image between two overlapping windows and one single window. Try it now. You will see it switch back-and-forth each time you click on it between one square and two overlapping squares (or windows). When you see two overlapping squares, the window should cover the full screen. When you see just one square, the window will only cover a portion of the screen. If this seems counter-intuitive to you, it means while you are in the smaller mode, you can click on the 'one square image' to make one window fill the full screen. When you are in the full screen mode, you can click on the 'two overlapping squares image' to make the current window smaller, allowing you to see more than one window.
Usually, you will want to see the window open in a full screen. You will usually want to work on one thing at a time and be able to see as much of the window as possible. Other times, you may wish to see two windows at the same time. Maybe you want to compare information on one window to another window. For example, you may want to compare two products sold by different store web sites. Or, maybe you want to read information off of one window (let's say a web page) while typing it in to another window (such as an email message).
Changing the size of the window
When your window is in the smaller mode, you can resize it. For example, you can make one window cover the left half of the screen and another window cover the right half of the screen. Another example would be to make four quarter-sized windows so you could see four windows at the same time. For now, let's practice resizing just one screen.
Make sure you have clicked the toggle in the upper right corner of your window so you see one square box, which signifies you are in a smaller window mode. Now, move your cursor to the right side of the window. Just as you cross over the right edge of the window, your cursor should turn into a black arrow that faces both to the left and right. While your cursor is showing as this black arrow, click down on your mouse. While holding down on the mouse button, you can now move it to the left or right to resize that side of the window to the left or right. The other three sides of the window will stay the same while you change the right side. Now, you can go to the top of the window. When you move your cursor over the top edge of the window, you will see an up and down black arrow. Again, hold down your mouse button and adjust that side of the window up or down. Repeat these steps for the left and bottom sides of the window. Once you have resized this window, you can then resize a 2nd window.
Now that you have resized the two windows, practice moving them around your screen. To do this, move your cursor up to the top of the window. Click and hold down your mouse button anywhere along the bar that runs across the top of the window. You can click anywhere to the left of the three boxes we have been discussing for this lesson. If you recall, these three boxes are on the top right corner of the window. If you see the black arrow we used to resize the window, you have gone just a tad too far. Come back down just a bit so your cursor looks like a white arrow. While holding down the cursor on this top bar with your mouse button, you can drag it up or down and left or right on your screen. To practice, you may want to move one window to the left and move the 2nd window to the right. Now, you will be able to see two windows side-by-side.
Minimize the Window
We have yet to discuss the last box in the top right corner of the window. It is the one with a line along the bottom of the box. This is the minimize button. If you click on this, your window will disappear off the screen. However, you can still access it from the taskbar at the bottom of your screen. It will be one of the tabs along the bottom. Use this option if you are not ready to close the window just yet but you don't need to work on it at the current moment. Or, use it if you want to access something on your desktop or if you want to take a break and look at your wallpaper image.
There is also a keyboard shortcut you can use to minimize all of the images at the same time. While holding down your 'Start' key, click on the letter 'D'. This will instantly minimize all of your windows. Try it now.
That ends this lesson on working with computer windows. Congratulations on building familiarity with your computer. After learning to use the computer mouse, learning how to work with windows is probably the next hardest thing. Once these two concepts become second nature through experience, you will be well along your way to enjoying the internet. These two lessons are by far the hardest for beginners. Once you are comfortable with them, you will find all of the other lessons needed to navigate the internet quite easy. If you forget anything along the way, you can always come back to this article by using our 'Quick Access for Beginners' drop-down list in the right column of each page. The drop-down list provides a link to all of the Beginners Lessons. Javascript required.
More Lessons on Internet Help for Beginners
See also Internet Security for Beginners and Email for Beginners
- Lesson 1: Computer Mouse - How to use it and when to push the buttons
- Lesson 2: Hyperlinks - How to open a new web page
- Lesson 3: Back Button - How to return to the previous web page
- Current : Windows - How to manage windows on your screen
- Lesson 5: Web Browser - What are Internet Explorer, Firefox & Safari?
- Lesson 6: Address Bar - How to enter a web address
- Lesson 7: Web Page vs. Web Site - Learn the difference between the two
- Lesson 8: Menu Bar - Access to everything you need
- Lesson 9: Bookmark Favorites - Save your favorite web sites
- Lesson 10: Drop-Down-Lists - How to make selections on web sites
- Lesson 11: Javascript - Why some web sites do not work for you
- Lesson 12: Web-Accessibility - Problems reading web sites
Help Others & Good Luck
Our goal is to make you comfortable using the ever expanding internet. We especially want to reach out to online beginners and let them know it is not too late to get started. As more services, especially free ones, move online, we believe it is important that everyone learn the basics for navigating the internet. Think of a family member or friend who may find this web site helpful and forward it to them today. We wish you Good Luck and an Enjoyable Journey on the Internet.
ShopWithTrust.com also provides easy access to trusted retailers. We keep things simple for you by only listing stores with a long history of name recognition. We would like to be your one stop source for online shopping with stores like Macy's, Target, Walmart, and Best Buy. Thank You and Best Wishes.
